WebGL tombstone - part 1
Recently, I’ve been combining 2D Canvas objects with WebGL Canvas objects, and figured it would be nice to put together a demo with some of the techniques used.
An obvious application for these techniques is an in-browser tombstone designer, that’ll let us take a nice slab of rock and draw and carve all over it. Beats me why this hasn’t been done before.
Today we’re going to look at setting up a 2D Canvas with some basic drawing capabilities, and linking it to a 3D scene. The actual carving will come in a later post, for now we’ll limit ourselves to vandalism, that is: drawing on the surface of the rock, like with a spray can. After all, they say it’s easier to destroy than to create…
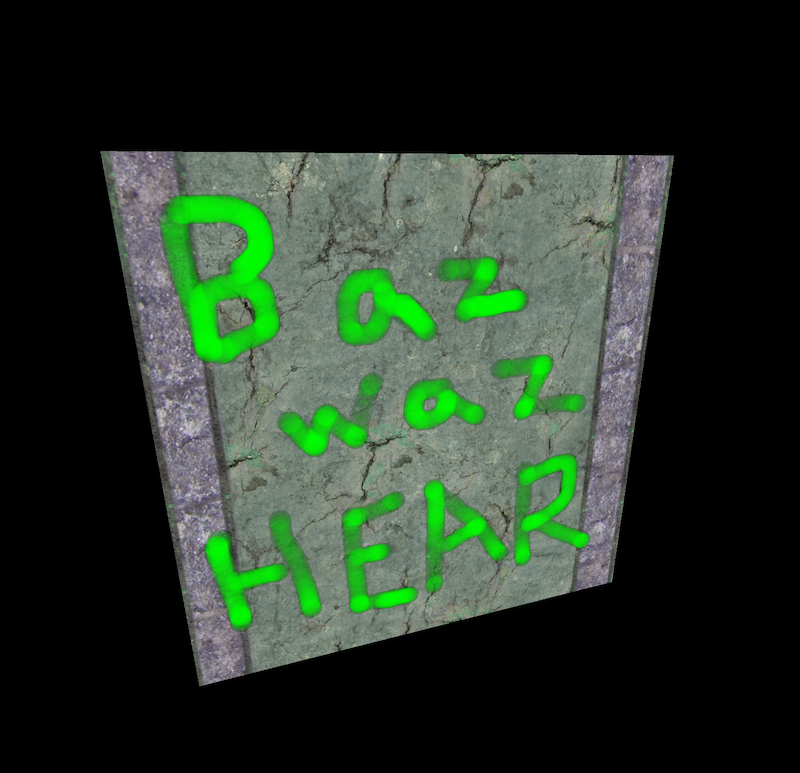
Here’s something I drew earlier, while I was feeling particularly inspired:
 For the impatient, here’s a live demo
Getting started
For this project, I’ve used amd-three.js as a starting point, which will set us up with 3D scene that has a single cube:
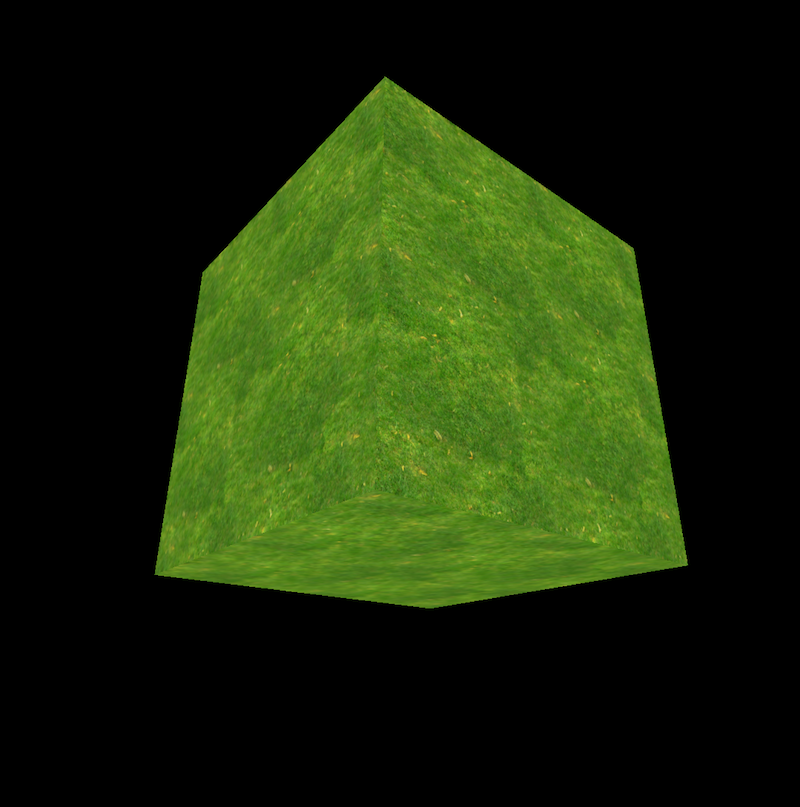
If you want more detail on how amd-three.js works, check out this post.
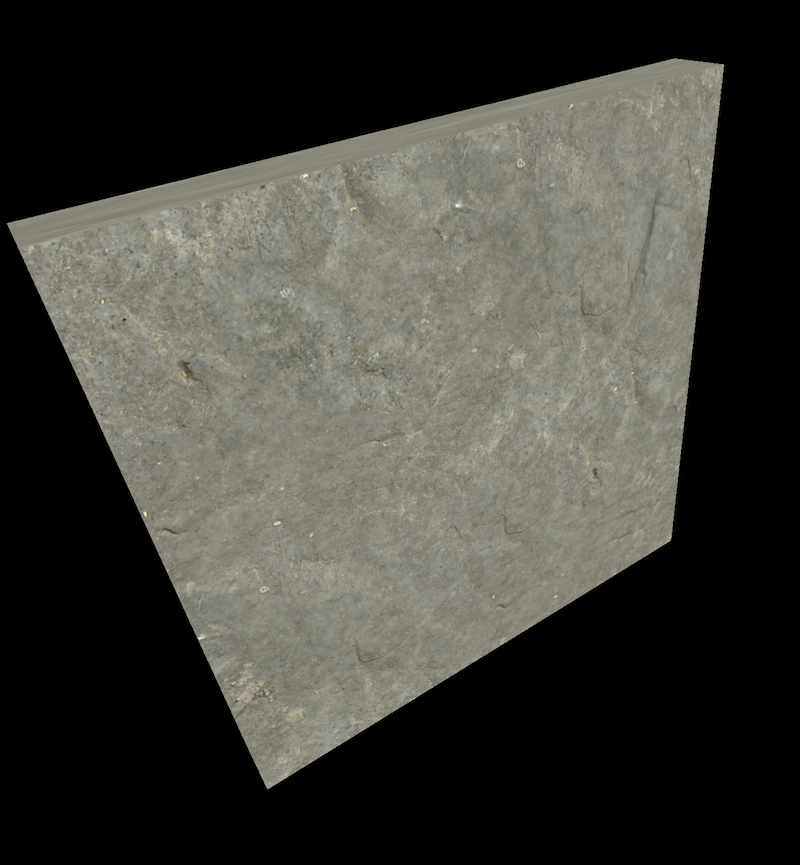
To make this grassy cube a piece of rock, we just need to create a block geometry in the js/app/geometry.js file:
block: new THREE.CubeGeometry( 200, 200, 20, 10, 10, 1 )
…and add a stone texture in js/app/texture.js:
stone: THREE.ImageUtils.loadTexture( texturePath + "stone.png" )
Now, we just change we mesh that we’re creating in js/app/app.js to use these parameters and we have ourselves a blank slab of rock:
Scribbling
Now, you’re probably itching to unleash your own creative talent, but before that can happen, we first need to look at how we can draw to a Canvas.
We’ll encapsulate all our drawing code in a object called scribbler, located at js/app/scribbler.js. When initialized, the scribbler will create its own Canvas for drawing and register some methods for capturing mouse input.
var scribbler = {
  init: function() {
    container.innerHTML = "";
    scribbler.canvas = document.createElement( 'canvas' );
    scribbler.ctx = scribbler.canvas.getContext( '2d' );
    container.appendChild( scribbler.canvas );

    // Listen for mouse events
    scribbler.canvas.addEventListener( 'mousedown', scribbler.onMouseDown, false );
    scribbler.canvas.addEventListener( 'mousemove', scribbler.onMouseMove, false );
    scribbler.canvas.addEventListener( 'mouseup', scribbler.onMouseUp, false );
  },
}
Here container is the DOM element that the drawing Canvas will be appended to, which is passed into the file using Require.js, like so:
define( ["drawing-container"], function( container ) {
  var scribbler = { //...
  }
  return scribbler;
});
So, what are these onMouse functions? Nothing too interesting, they just capture where the user clicks and drags on the Canvas, and invoke the paint function, which does the actual drawing.
onMouseDown: function( e ) {
  scribbler.drawing = true;
  scribbler.paint( e.offsetX || e.layerX, e.offsetY || e.layerY );
},
onMouseMove: function( e ) {
  if ( scribbler.drawing ) {
    scribbler.paint( e.offsetX || e.layerX, e.offsetY || e.layerY );
  }
},
onMouseUp: function( e ) {
  scribbler.drawing = false;
},
When looking at the event e, we need to first try offsetX and then layerX, as different browsers like to give this property a different name, to make the world a more interesting place.
And finally, our paint function:
paint: function( x, y ) {
  scribbler.ctx.beginPath();
  scribbler.ctx.arc( x, y, 10, 0, 2 * Math.PI, false );
  scribbler.ctx.fillStyle = "rgba(1, 255, 0, 0.2)";
  scribbler.ctx.fill();
  scribbler.ctx.closePath();
  scribbler.updated = true;
},
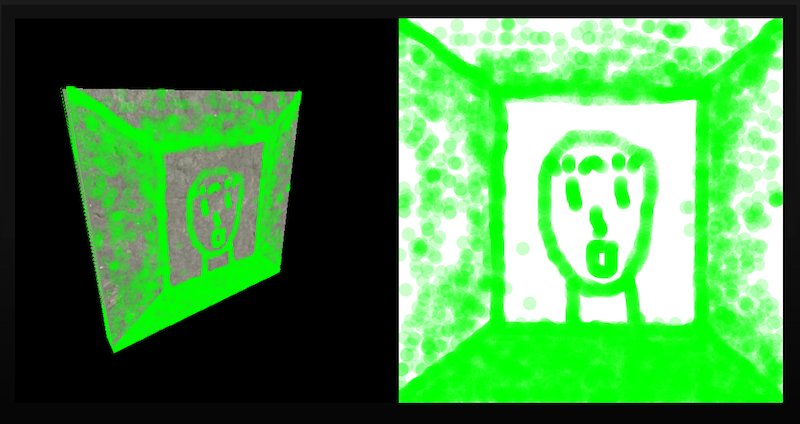
This will draw a circle, 10 pixels in radius, in a semitransparent garish green.
Great, so now we can draw on our Canvas:

Putting it together
We now have an excellent picture of a pig and a spinning rock, so it is tempting at this point to call it quits and end on a high note. However, that would be cowardly, so let’s push on and combine the two.
Our 3D scene currently only has one object in it, the rock. To make it look like there is something drawn on top of it, we’ll create another object the same shape as the rock, and make it ever so slightly bigger, so that it appears in front. Then we’ll apply the drawing we have on our drawing Canvas to this object as texture and we’ll be done.
So, in js/app/app.js, we’ll modify our scene like so:
var app = {
  baseMesh: new THREE.Mesh( geometry.block, material.stone1 ),
  drawMesh: new THREE.Mesh( geometry.block, material.scribbler ),
  init: function() {
    scene.add( app.baseMesh );
    scene.add( app.drawMesh );

    // Draw mesh is slightly larger, so that it appears in front of base mesh
    app.drawMesh.scale = new THREE.Vector3( 1.01, 1.01, 1.01 );
  }
}
Pretty simple, but to make it work we have to create a new material, material.scribbler, that will automatically pick up changes to our drawing Canvas. The material is just like the stone one we created earlier, except that it uses a different texture and is transparent:
scribbler: new THREE.MeshBasicMaterial( {
  map: texture.scribbler,
  transparent: true
} ),
To complete the linkage, we’ll need to create a texture, texture.scribbler that is backed by the drawing Canvas, rather than a static image. When we created the drawing Canvas earlier, we assigned it to scribbler.canvas, so to get at it all we have to do is pull in the scribbler object into texture.js and use it like so:
define( ["three", "scribbler"], function( THREE, scribbler ) {
  // ...
  var scribblerTexture = new THREE.Texture( scribbler.canvas );
  scribblerTexture.needsUpdate = true;
  return {
    scribbler: scribblerTexture,
  }
} );
Great, now we have a material that is backed by our drawing Canvas. But when we run our code, our rock stays perfectly clean, no matter how much we draw. What’s wrong? Well, whenever we make a change to the drawing Canvas, we need to set the needsUpdate flag to true on the texture, otherwise it’ll continue using the old data.
One place we can do this is in the animate function in js/app/app.js, which is called on every frame.
animate: function() {
  requestAnimationFrame( app.animate );

  // Update texture based on what is on drawing canvas
  if ( scribbler.updated ) {
    texture.scribbler.needsUpdate = true;
    scribbler.updated = false;
  }
}
Notice that we’re using the scribbler.updated flag to ensure we only update the texture if we’ve drawn something new. If you go back to the code for scribbler.paint() you’ll notice we set this to true whenever we update the Canvas.
Now we’re done. As we draw on the drawing Canvas, our scribblings will appear on the tombstone - in realtime.
Go vandalize
To check out how all the code fits together, take a look at the source on github. For a live demo, go here.
Also be sure to check out the next post in the series, where we’ll look at carving into the stone.