Introduction to images in Go - Websockets
This post is part of a series. For a listing of all the posts, as well as instructions on running the code, see here.
In the last post we looked at how to set up a HTTP server, for serving up an API or static files. Today we’ll do something more real-time, namely using WebSockets to stream data from our Go program and display it visually on a HTML5 Canvas element.
Hello WebSockets
You’ve likely already heard of WebSockets, essentially a mechanism for opening up a socket between the server and browser, to allow real-time two-way communication. To use them in Go, we’ll first need to import code.google.com/p/go.net/websocket and then write the following to get the standard echo server up and running:
func WebsocketHandler(ws *websocket.Conn) {
  io.Copy(ws, ws)
}

func main() {
  router := mux.NewRouter()
  router.Handle("/ws", websocket.Handler(WebsocketHandler))
  staticHandler := http.FileServer(http.Dir("."))
  router.PathPrefix("/").Handler(staticHandler)
  http.ListenAndServe("localhost:1234", router)
}
We’re using Mux like last time, although it isn’t really necessary - more to show that we can. Note that we have also added a handler for serving static files, using the same router as we have for WebSockets, and it happily works all together.
Now we need some sort of client to test out that this works. Naturally we could write this in Go, but given that our goal is to communicate with the browser, let’s do it in JavaScript:
function wsConnect()
{
  ws = new WebSocket( wsUri );
  ws.onopen = function( e ) {
    console.log( "CONNECTED" );
    ws.send( "READY" );
  };
  ws.onclose = function( e ) {
    console.log( "DISCONNECTED" );
  };
  ws.onmessage = function( e ) {
    console.log( "MESSAGE: " + e.data );
  };
  ws.onerror = function( e ) {
    console.log( 'WS Error: ' + e.data );
  };
}
Not much here, really. We create a WebSocket, and register some handlers that just print out what is flowing over WebSockets to the console. We then kick off a send once the WebSocket is connected. If you launch the ws_echo_server.go example using go run ws_echo_server.go and navigate to localhost:1234/wsecho.html, you should now be able to play around with WebSockets using your browser’s console. You can try sending a message by entering something like: ws.send("hi!") and have the server echo it back to you.
Sending an image
OK, so with that in place lets send something more interesting. Rather than just echoing back the message lets have the server stream pixels to the browser and have that display them on a HTML5 Canvas element. We’ll use a format like this to send the messsage:
PIXEL x y color
Where PIXEL is the name of the command to the client for drawing a single pixel, x and y are the coordinates, and color is the color to draw. So a message may look like so:
PIXEL 13 74 #ff23e1
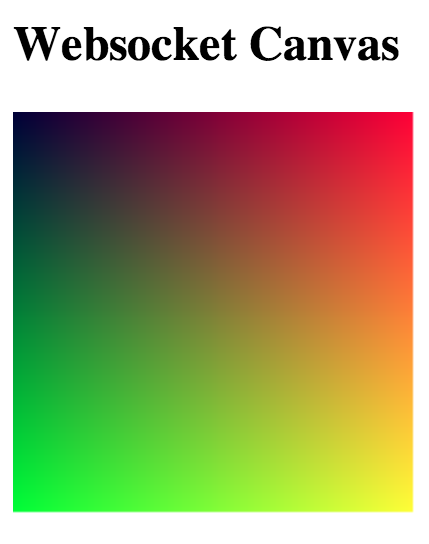
Why not try to use this to send an image? Well actually it is a pretty terrible idea sending an image, pixel by pixel, over WebSockets - but that’s no reason not to try. We’ll need to modify our handler so that we have:
func GradientHandler(ws *websocket.Conn) {
  width, height := 200, 200
  canvas := NewCanvas(image.Rect(0, 0, width, height))
  canvas.DrawGradient()
  for x := 0; x < width; x++ {
    for y := 0; y < height; y++ {
      r, g, b, _ := canvas.At(x, y).RGBA()
      color := fmt.Sprintf("#%02x%02x%02x", r/0xFF, g/0xFF, b/0xFF)
      msg := fmt.Sprintf("PIXEL %d %d %s\n", x, y, color)
      io.WriteString(ws, msg)
    }
    time.Sleep(time.Second / 30.0)
  }
}
And now for the client, we’ll modify the onmessage function to draw to a Canvas element:
ws.onmessage = function( e ) {
  var data = e.data.split("\n");
  for ( var line in data ) {
    var msg = data[line].split(" ");
    var cmd = msg[0];
    if ( cmd == "PIXEL" ) {
      var x = parseInt(msg[1]);
      var y = parseInt(msg[2]);
      var color = msg[3];
      ctx.fillStyle = color;
      ctx.fillRect( x, y, 1, 1 );
    } else {
      console.log( "Unknown command: " + cmd );
    }
  }
};
To try it out have a look at the server and client on github. To run, use go run ws_canvas.go canvas.go vector.go and navigate to localhost:1234/wscanvas.html. You should wind up with a progressively loading gradient image, which’ll eventually look like this:
Streaming data
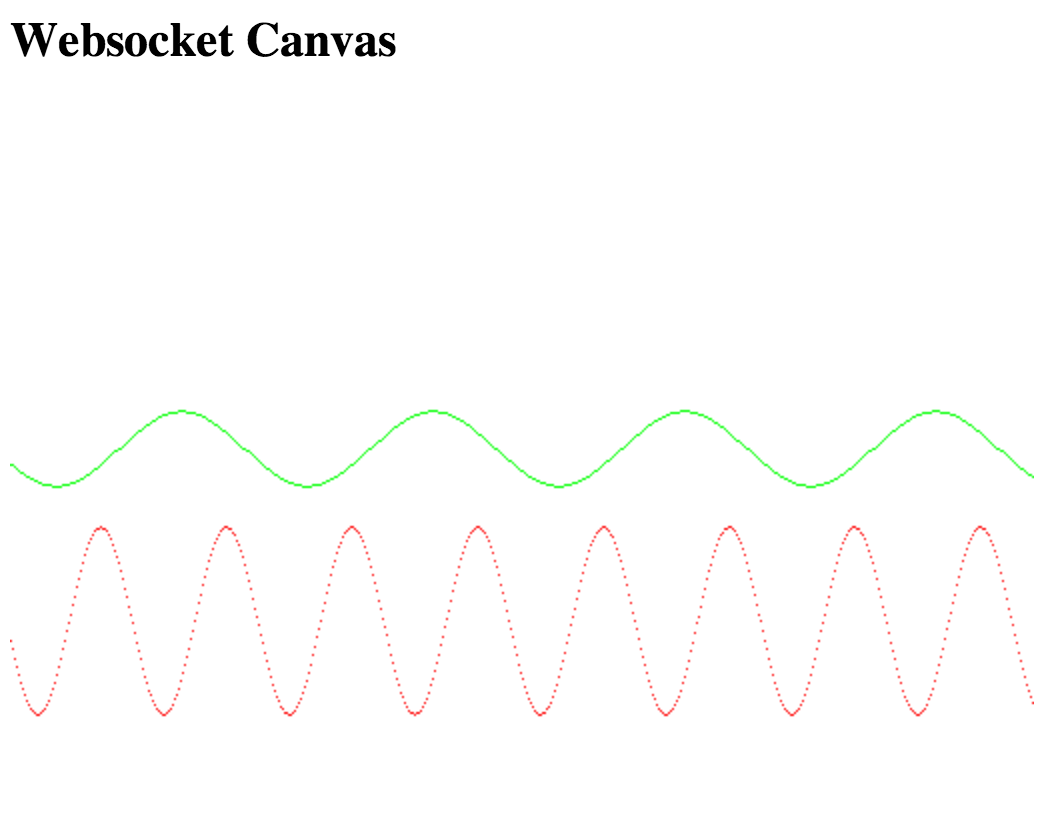
Lets now try our hand at some animation. What we’ll do is stream a new set of pixels to the client on every frame and have it redraw the content on the canvas. To make sure we don’t draw on top of what is already there, we’ll need to add rather trivial extension to our protocol, namely a CLEAR command. Check the source for the JavaScript implementation. Our new Go handler, meanwhile will look like this:
func GraphHandler(ws *websocket.Conn) {
  width, height := 512, 512
  t := 0.0
  for {
    msg := "CLEAR\n"
    for x := 0; x < width; x++ {
      y := height/2 + int(50 * math.Sin(t/10) * math.Sin(float64(x)/10.0 + t))
      y2 := height/3 + int(60 * math.Sin(t/9) * math.Sin(float64(x)/20.0 + 2.0 * t))
      msg += fmt.Sprintf("PIXEL %d %d %s\n", x, y, "#ff0000")
      msg += fmt.Sprintf("PIXEL %d %d %s\n", x, y2, "#00ff00")
    }
    t += 0.3
    io.WriteString(ws, msg)
    time.Sleep(time.Second / 30.0)
  }
}
We iterate from the left to right of the image, and set pixels based on some mathematical equation. By including a time variable t we make the equations change over time. Another thing to notice is that rather than sending each command separately, we’ve added functionality in the client to receive multiple messages at once, i.e. the following will now work as a single message:
CLEAR
PIXEL 0 1 #00ff00
PIXEL 0 2 #00ee00
PIXEL 0 3 #00dd00
PIXEL 0 4 #00cc00
You can run this example in the same way as the gradient one above, just be sure to switch the handler that is registered with the router in the main function.
If all is well you should see some jolly sine curves dancing across your screen. Here’s a static screenshot:
Concurrency
One thing that is I didn’t mention before, is that this http server that we have built is taking advantage of Go’s concurrency. Namely the http module runs our handlers in a concurrent manner and as such we can load up multiple clients and have them all display the animation at the same time. We could even go further and use the input from one window to influence the output in other, by using channels to communicate between the handlers.